No edit summary Tag: rte-source |
mNo edit summary Tag: rte-source |
||
| (5 intermediate revisions by the same user not shown) | |||
| Line 1: | Line 1: | ||
| + | {{Ambox/Under_Construction}} |
||
| ⚫ | |||
| + | {| class="wikitable plainlinks" style="width:100%;text-align:center;font-size:12px" |
||
| + | ! colspan="2" | |
||
| + | 5-2: Sea near Crete/克里特附近海域 |
||
| + | |- |
||
| + | | style="“width:50%”" |[[Battles/5-1|← 5-1: Sea near Cyprus/塞浦路斯附近海域]] |
||
| + | | style="“width:50%”" |[[Battles/5-3|5-3: Sea near Malta/马耳他附近海域 →]] |
||
| + | |- |
||
| + | | colspan="2" | |
||
| + | {| class="mw-collapsed mw-collapsible plainlinks wikitable" style="width:100%;text-align:center;font-size:12px" |
||
| + | ! colspan="2" |Chapter 5: Battle of Mediterranean |
||
| + | |- |
||
| + | | colspan="2" |[[Battles/5-1|5-1: Sea near Cyprus/塞浦路斯附近海域]] |
||
| + | |- |
||
| + | | colspan="2" |5-2: Sea near Crete/克里特附近海域 |
||
| + | |- |
||
| + | | colspan="2" |[[Battles/5-3|5-3: Sea near Malta/马耳他附近海域]] |
||
| + | |- |
||
| + | | colspan="2" |[[Battles/5-4|5-4: Sea near East Gibraltar/直布罗陀东部海域]] |
||
| + | |- |
||
| + | | colspan="2" |[[Battles/5-5|5-5: Gibraltar Fortress/直布罗陀要塞]] |
||
| + | |} |
||
| + | |} |
||
| + | |||
| ⚫ | |||
{{hide|title = Real world terrain| |
{{hide|title = Real world terrain| |
||
| Line 6: | Line 30: | ||
== Branching == |
== Branching == |
||
| − | {| class="wikitable" style="text-align:center |
+ | {| class="mw-collapsible mw-collapsed wikitable" style="text-align:center" |
| + | !colspan="4"|Branching |
||
| + | |- |
||
!Departing |
!Departing |
||
!Arriving |
!Arriving |
||
| Line 36: | Line 62: | ||
| rowspan="2" |F |
| rowspan="2" |F |
||
| H |
| H |
||
| − | | Flagship level ≥ 60 |
+ | | Flagship's level ≥ 60 |
| ★ |
| ★ |
||
|- |
|- |
||
| Line 45: | Line 71: | ||
== Strategy == |
== Strategy == |
||
| + | {| class="mw-collapsible mw-collapsed wikitable" style="text-align:center" |
||
| − | + | !colspan="3"|Requirement to boss |
|
| − | * B → E → H → {{color|red|'''J'''}} * '''Recommend route'''<br/> Lowest speed ≤ 26.9 <br/> Flagship's speed ≥ 25.1 <br/> DD ≥ 2 <br/> |
||
| + | |- |
||
| − | * C → F → I → {{color|red|'''J'''}} * ''' ''(Beware! Node C is fishpond)'' '''<br/> Lowest speed ≤ 26.9 <br/> Flagship's speed ≤ 25 <br/> DD ≤ 1 <br/> Flagship level ≤ 59 (or luck) <br/> CL ≥ 2 (or luck) <br/> |
||
| + | !Route !!Conditions !!Number of Combats |
||
| − | * C → F → H → {{color|red|'''J'''}} * ''' ''(Beware! Node C is fishpond)'' '''<br/> Lowest speed ≤ 26.9 <br/> Flagship's speed ≤ 25 <br/> DD ≤ 1 <br/> Flagship level ≥ 60 (or luck) <br/> CL ≤ 1 (or luck) <br/> |
||
| + | |- |
||
| − | * A → D → H → {{color|red|'''J'''}} <br/> Lowest speed ≥ 27 <br/> DD ≤ 1 <br/> Flagship's speed ≥ 25.1 CA ≥ 3 |
||
| + | | rowspan="3"| <span title="This route is ensure to boss">B → E → H → {{color|red|'''J'''}} <nowiki>*</nowiki> </span> |
||
| − | |||
| + | | DD ≥ 2 |
||
| − | Note: * means route(s) ensure to boss}} |
||
| + | | rowspan="3"| 4 |
||
| + | |- |
||
| + | | Lowest speed ≤ 26.9 |
||
| + | |- |
||
| + | | Flagship's speed ≥ 25.1 |
||
| + | |- |
||
| + | | rowspan="5"| <span title="This route is ensure to boss">C → F → I → {{color|red|'''J'''}} </span> *<br />'''''(Beware! Node C is fishpond)'' ''' |
||
| + | | DD ≤ 1 |
||
| + | | rowspan="5"| 4 |
||
| + | |- |
||
| + | | CL ≥ 2 |
||
| + | |- |
||
| + | | Lowest speed ≤ 26.9 |
||
| + | |- |
||
| + | | Flagship's speed ≤ 25 |
||
| + | |- |
||
| + | | Flagship's level ≤ 59 |
||
| + | |- |
||
| + | | rowspan="5"| <span title="This route is ensure to boss">C → F → H → {{color|red|'''J'''}} </span> *<br />'''''(Beware! Node C is fishpond)'' ''' |
||
| + | | DD ≤ 1 |
||
| + | | rowspan="5"| 4 |
||
| + | |- |
||
| + | | CL ≤ 1 |
||
| + | |- |
||
| + | | Lowest speed ≤ 26.9 |
||
| + | |- |
||
| + | | Flagship's speed ≤ 25 |
||
| + | |- |
||
| + | | Flagship's level ≥ 60 |
||
| + | |- |
||
| + | | rowspan="4"| A → D → H → {{color|red|'''J'''}} |
||
| + | | DD ≤ 1 |
||
| + | | rowspan="4"| 4 |
||
| + | |- |
||
| + | | CA ≥ 3 |
||
| + | |- |
||
| + | | Lowest speed ≥ 27 |
||
| + | |- |
||
| + | | Flagship's speed ≥ 25.1 |
||
| + | |} |
||
| − | {| class="wikitable" style=" text-align:center;width:100%;font-size: |
+ | {| class="wikitable" style=" text-align:center;width:100%;font-size:16px; |
|- |
|- |
||
!rowspan="2"| Quest |
!rowspan="2"| Quest |
||
| Line 73: | Line 139: | ||
|Explore all areas in map 5-2 |
|Explore all areas in map 5-2 |
||
|210||210||210||70 |
|210||210||210||70 |
||
| − | |Instant Repair |
+ | |Instant Repair<br />[[File:Shop-Items-8.png|30px]] x4 |
|- |
|- |
||
|Suppress 5-2 |
|Suppress 5-2 |
||
|Use a fleet with {{color|red|2 CVLs}} to defeat the final fleet in 5-2 |
|Use a fleet with {{color|red|2 CVLs}} to defeat the final fleet in 5-2 |
||
|270||270||270||90 |
|270||270||270||90 |
||
| − | |Warship Blueprint |
+ | |Warship Blueprint<br />[[File:Shop-Items-5.png|30px]] x4 |
|} |
|} |
||
| Line 86: | Line 152: | ||
! Node !! Fleet Name !! colspan="6" | Ships |
! Node !! Fleet Name !! colspan="6" | Ships |
||
!Formation |
!Formation |
||
| − | |||
|- |
|- |
||
| rowspan="3" | A |
| rowspan="3" | A |
||
| Line 114: | Line 179: | ||
| {{color|purple|ΔⅡ DD}} |
| {{color|purple|ΔⅡ DD}} |
||
| Double Line |
| Double Line |
||
| − | |||
|- |
|- |
||
| rowspan="3" | B |
| rowspan="3" | B |
||
| Line 141: | Line 205: | ||
| {{color|purple|ΗⅡ CL}} |
| {{color|purple|ΗⅡ CL}} |
||
| Echelon |
| Echelon |
||
| − | |||
|- |
|- |
||
| rowspan="3" | C |
| rowspan="3" | C |
||
| Line 167: | Line 230: | ||
| X |
| X |
||
| Double Line |
| Double Line |
||
| − | |||
|- |
|- |
||
| rowspan="3" | D |
| rowspan="3" | D |
||
| Line 194: | Line 256: | ||
| {{color|purple|ΔⅡ DD}} |
| {{color|purple|ΔⅡ DD}} |
||
| Double Line |
| Double Line |
||
| − | |||
|- |
|- |
||
| rowspan="3" | E |
| rowspan="3" | E |
||
| Line 220: | Line 281: | ||
| {{color|purple|ΣⅡ SS}} |
| {{color|purple|ΣⅡ SS}} |
||
| Line Ahead |
| Line Ahead |
||
| − | |||
|- |
|- |
||
| rowspan="3" | F |
| rowspan="3" | F |
||
| Line 245: | Line 305: | ||
| {{color|purple|ΞⅡ CVL}} |
| {{color|purple|ΞⅡ CVL}} |
||
| {{color|purple|ΣⅡ SS}} |
| {{color|purple|ΣⅡ SS}} |
||
| − | |||
|- |
|- |
||
| rowspan="3" | G |
| rowspan="3" | G |
||
| Line 269: | Line 328: | ||
| {{color|orange|ΠⅢ SS}} |
| {{color|orange|ΠⅢ SS}} |
||
| X |
| X |
||
| − | |||
|- |
|- |
||
| rowspan="3" | H |
| rowspan="3" | H |
||
| Line 296: | Line 354: | ||
| {{color|orange|ΕⅢ CL}} |
| {{color|orange|ΕⅢ CL}} |
||
| Line Ahead |
| Line Ahead |
||
| − | |||
|- |
|- |
||
| rowspan="3" | I |
| rowspan="3" | I |
||
| Line 323: | Line 380: | ||
| {{color|purple|ΣⅡ SS}} |
| {{color|purple|ΣⅡ SS}} |
||
| Diamond |
| Diamond |
||
| − | |||
|- |
|- |
||
| rowspan="3" | {{color|red|'''J'''}} |
| rowspan="3" | {{color|red|'''J'''}} |
||
Latest revision as of 18:50, 15 November 2016
 |
This page is under construction
This page is under construction, please mind your steps :) |
|
5-2: Sea near Crete/克里特附近海域 | |||||||||||||
|---|---|---|---|---|---|---|---|---|---|---|---|---|---|
| ← 5-1: Sea near Cyprus/塞浦路斯附近海域 | 5-3: Sea near Malta/马耳他附近海域 → | ||||||||||||
| |||||||||||||
| Real world terrain |
|---|
|
|

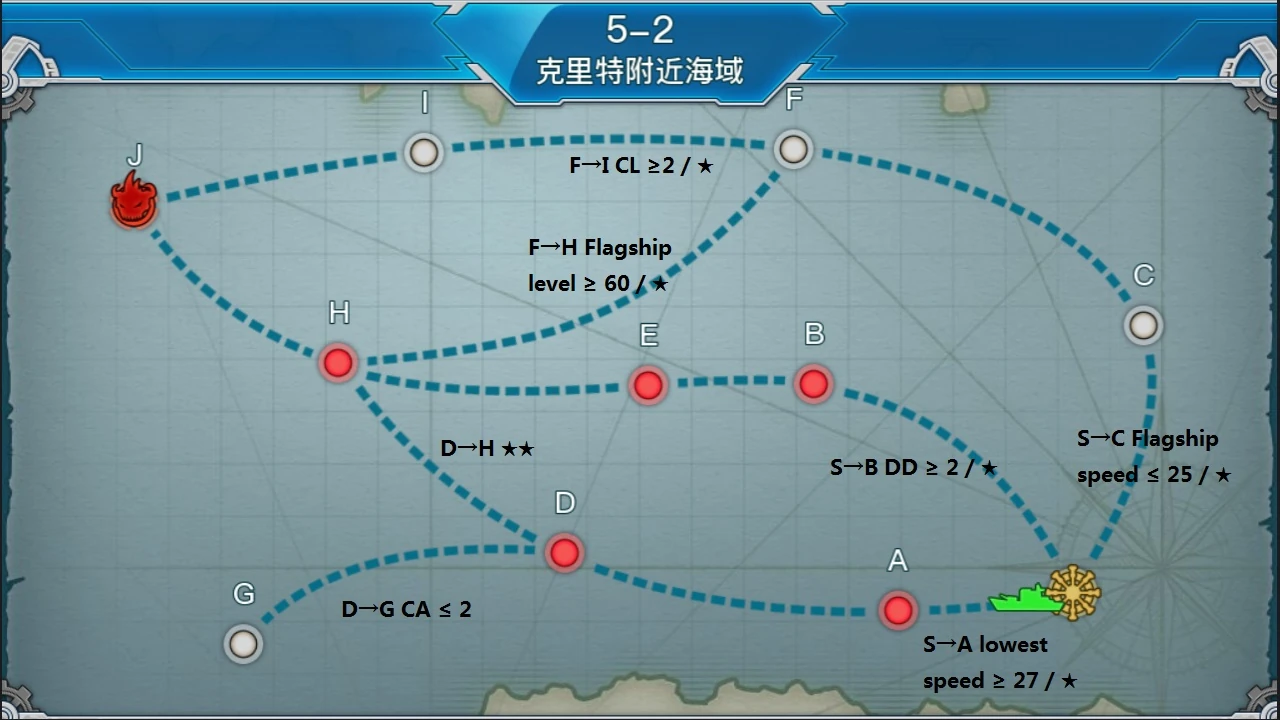
Branching
| Branching | |||
|---|---|---|---|
| Departing | Arriving | Conditions | Probability |
| Start | A | Lowest speed ≥ 27 | ★ |
| B | DD ≥ 2 | ★ | |
| C | Flagship's speed ≤ 25 | ★ | |
| D | G | CA ≤ 2 | ★ |
| H | ★★ | ||
| F | H | Flagship's level ≥ 60 | ★ |
| I | CL ≥ 2 | ★ | |
Strategy
| Requirement to boss | ||
|---|---|---|
| Route | Conditions | Number of Combats |
| B → E → H → J * | DD ≥ 2 | 4 |
| Lowest speed ≤ 26.9 | ||
| Flagship's speed ≥ 25.1 | ||
| C → F → I → J * (Beware! Node C is fishpond) |
DD ≤ 1 | 4 |
| CL ≥ 2 | ||
| Lowest speed ≤ 26.9 | ||
| Flagship's speed ≤ 25 | ||
| Flagship's level ≤ 59 | ||
| C → F → H → J * (Beware! Node C is fishpond) |
DD ≤ 1 | 4 |
| CL ≤ 1 | ||
| Lowest speed ≤ 26.9 | ||
| Flagship's speed ≤ 25 | ||
| Flagship's level ≥ 60 | ||
| A → D → H → J | DD ≤ 1 | 4 |
| CA ≥ 3 | ||
| Lowest speed ≥ 27 | ||
| Flagship's speed ≥ 25.1 | ||
| Quest | Description | Reward | ||||
|---|---|---|---|---|---|---|
| Others | ||||||
| Pass 5-2 | Defeat final fleet in map 5 | 150 | 150 | 150 | 50 | |
| Control 5-2 | Explore all areas in map 5-2 | 210 | 210 | 210 | 70 | Instant Repair |
| Suppress 5-2 | Use a fleet with 2 CVLs to defeat the final fleet in 5-2 | 270 | 270 | 270 | 90 | Warship Blueprint |
Enemy Fleet Strength
| Node | Fleet Name | Ships | Formation | |||||
|---|---|---|---|---|---|---|---|---|
| A | Enemy Guard Fleet | ΙⅡ CA | ΗⅢ CL | ΕⅢ CL | ΔⅡ DD | ΔⅡ DD | ΔⅡ DD | Line Ahead |
| Enemy Defence Fleet | ΚⅡ BC | ΞⅡ CVL | ΕⅢ CL | ΗⅡ CL | ΗⅡ CL | ΔⅡ DD | ||
| Enemy Destoryer Fleet | ΙⅡ CA | ΞⅡ CVL | ΞⅡ CVL | ΗⅡ CL | ΔⅡ DD | ΔⅡ DD | Double Line | |
| B | Enemy Carriers Fleet | ΟⅡ CV | ΟⅡ CV | ΞⅡ CVL | ΞⅡ CVL | ΗⅡ CL | ΗⅡ CL | Diamond |
| ΚⅡ BC | ΟⅡ CV | ΞⅡ CVL | ΞⅡ CVL | ΔⅡ DD | ΔⅡ DD | Double Line | ||
| ΟⅡ CV | ΞⅡ CVL | ΞⅡ CVL | ΙⅡ CA | ΙⅡ CA | ΗⅡ CL | Echelon | ||
| C | Enemy Submarines Fleet | ΞⅡ CVL | ΗⅢ CL | ΙⅡ CA | ΣⅠ SS | ΣⅠ SS | ΣⅠ SS | Line Ahead |
| ΠⅢ SS | ΠⅢ SS | ΠⅢ SS | ΣⅠ SS | X | Echelon | |||
| ΞⅡ CVL | ΗⅢ CL | ΠⅢ SS | ΣⅠ SS | ΣⅠ SS | X | Double Line | ||
| D | Enemy Carriers Fleet | ΟⅡ CV | ΟⅡ CV | ΚⅡ BC | ΓⅢ DD | ΔⅡ DD | ΔⅡ DD | Diamond |
| ΟⅡ CV | ΟⅡ CV | ΞⅡ CVL | ΙⅡ CA | ΗⅡ CL | ΗⅡ CL | |||
| Enemy Support Fleet | ΛⅢ BB | ΟⅡ CV | ΞⅡ CVL | ΗⅢ CL | ΗⅡ CL | ΔⅡ DD | Double Line | |
| E | Enemy main Fleet | ΚⅡ BC | ΚⅡ BC | ΟⅡ CV | ΞⅡ CVL | ΞⅡ CVL | ΣⅡ SS | Double Line |
| ΚⅡ BC | ΚⅡ BC | ΟⅡ CV | ΞⅡ CVL | ΗⅡ CL | ΣⅡ SS | |||
| ΜⅡ BB | ΚⅡ BC | ΚⅡ BC | ΙⅡ CA | ΙⅡ CA | ΣⅡ SS | Line Ahead | ||
| F | Enemy Support Fleet | ΛⅢ BB | ΟⅡ CV | ΟⅡ CV | ΞⅡ CVL | ΕⅢ CL | ΕⅢ CL | Diamond |
| ΟⅡ CV | ΟⅡ CV | ΚⅡ BC | ΞⅡ CVL | ΙⅡ CA | ΓⅢ DD | |||
| ΚⅡ BC | ΚⅡ BC | ΟⅡ CV | ΞⅡ CVL | ΞⅡ CVL | ΣⅡ SS | |||
| G | Enemy Submarines Fleet | ΡⅣ SS | ΡⅣ SS | ΣⅡ SS | ΣⅡ SS | X | Echelon | |
| ΟⅢ CV | ΟⅢ CV | ΣⅡ SS | ΣⅡ SS | ΠⅢ SS | X | |||
| ΡⅣ SS | ΡⅣ SS | ΣⅡ SS | ΣⅡ SS | ΠⅢ SS | X | |||
| H | Enemy Support Fleet | ΛⅢ BB | ΟⅢ CV | ΟⅡ CV | ΞⅡ CVL | ΞⅡ CVL | ΕⅢ CL | Diamond |
| ΚⅡ BC | ΚⅡ BC | ΟⅡ CV | ΞⅡ CVL | ΕⅢ CL | ΓⅢ DD | Double Line | ||
| ΛⅢ BB | ΚⅡ BC | ΚⅡ BC | ΙⅡ CA | ΙⅡ CA | ΕⅢ CL | Line Ahead | ||
| I | Enemy Support Fleet | ΛⅢ BB | ΚⅢ BC | ΚⅡ BC | ΙⅡ CA | ΙⅡ CA | ΣⅡ SS | Line Ahead |
| ΟⅢ CV | ΟⅢ CV | ΞⅡ CVL | ΙⅡ CA | ΕⅢ CL | ΕⅢ CL | Double Line | ||
| ΚⅢ BC | ΚⅢ BC | ΟⅡ CV | ΞⅡ CVL | ΞⅡ CVL | ΣⅡ SS | Diamond | ||
| J | Enemy Main Fleet | ΜⅢ BB | ΛⅢ BB | ΚⅡ BC | ΚⅡ BC | ΙⅡ CA | ΙⅡ CA | Line Ahead |
| ΚⅢ BC | ΟⅢ CV | ΟⅡ CV | ΚⅡ BC | ΚⅡ BC | ΣⅡ SS | Double Line | ||
| ΜⅢ BB | ΛⅢ BB | ΜⅡ BB | ΟⅡ CV | ΟⅡ CV | ΟⅡ CV | Diamond | ||