No edit summary Tag: rte-source |
No edit summary Tag: Visual edit |
||
| (8 intermediate revisions by one other user not shown) | |||
| Line 110: | Line 110: | ||
==== Line Abreast ==== |
==== Line Abreast ==== |
||
| − | Line abreast focuses on anti-sub warfare. This formation enhances the player's fleet's anti-sub-related ability, including evasion against torpedoes, and depth charge accuracy and damage. The best thing is that this formation allows squadrons to perform a preemptive anti-sub attack, which means you may destroy enemy submarine before they can fire torpedoes. Doesn't that sound great? Finally you can get rid of those cowards who only attack from the bottom. But remember that this formation is for anti-sub warfare only. Your |
+ | Line abreast focuses on anti-sub warfare. This formation enhances the player's fleet's anti-sub-related ability, including evasion against torpedoes, and depth charge accuracy and damage. The best thing is that this formation allows squadrons to perform a preemptive anti-sub attack, which means you may destroy enemy submarine before they can fire torpedoes. Doesn't that sound great? Finally you can get rid of those cowards who only attack from the bottom. But remember that this formation is for anti-sub warfare only. Your ships may fire artillery in this formation, yes, but expect their accuracy and damage to be slightly below average. |
| Line 218: | Line 218: | ||
Flyout amount = the smaller one between squadron size and the amount of airplanes left in the slot |
Flyout amount = the smaller one between squadron size and the amount of airplanes left in the slot |
||
| + | |||
| + | Flyout amount determines how many planes from that slot engage in battle at that particular node/stage, all other planes from that slot remain on the CV. |
||
Single slot power = ln[(flyout amount+1)*2]*plane's AA |
Single slot power = ln[(flyout amount+1)*2]*plane's AA |
||
Total aerial power = sum of all your single slot power |
Total aerial power = sum of all your single slot power |
||
| + | |||
| + | {| class="mw-collapsible mw-collapsed wikitable" |
||
| + | ! Flyout Amount Calculation Example |
||
| + | |- |
||
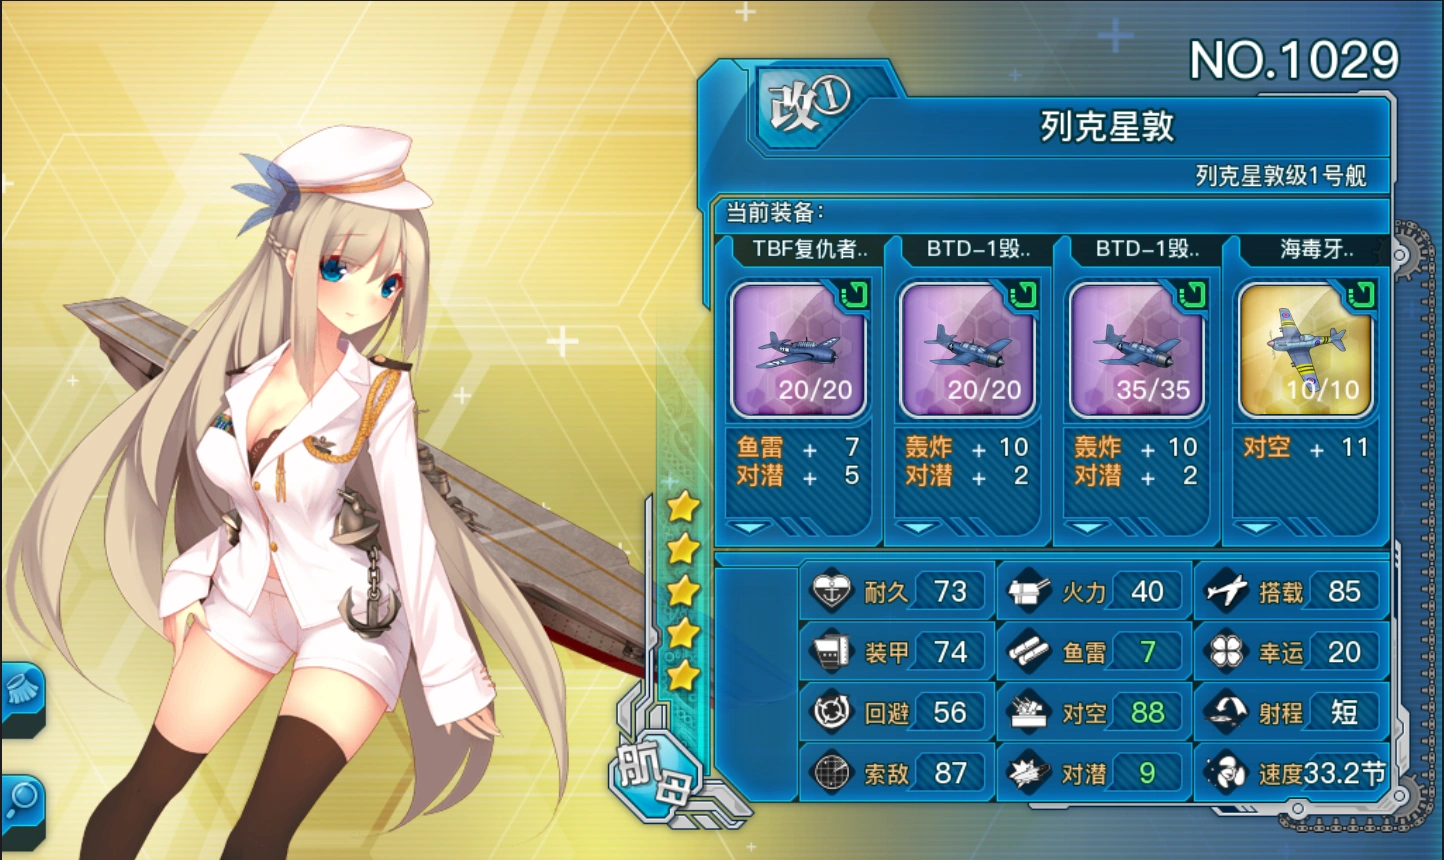
| + | |[[File:AAPowerCalcDemo.png|none|600px]]Lex's firepower is 40, her squadron size is 3 + 40/5 = 11<br />Flyout amount for first slot=11 (20>11)<br />Flyout amount for second slot=11 (20>11)<br />Flyout amount for third slot=11 (35>11)<br />Flyout amount for fourth slot=10 (11>10) |
||
| + | |} |
||
| + | |||
Relationship between total aerial power, aerial battle outcome, and fighter plane lost |
Relationship between total aerial power, aerial battle outcome, and fighter plane lost |
||
| Line 291: | Line 300: | ||
Flyout amount = the smaller one between squadron size and the amount of airplanes left in the slot |
Flyout amount = the smaller one between squadron size and the amount of airplanes left in the slot |
||
| − | Each slot's slot value = ln(flyout amount+1)*2*carried plane's value |
+ | Each slot's slot value = ln(flyout amount+1)*2*carried plane's value + 25 |
<span style="color:red">'''Final damage'''</span> is the number you see. It is rounded up. |
<span style="color:red">'''Final damage'''</span> is the number you see. It is rounded up. |
||
| Line 467: | Line 476: | ||
<span style="color:red">'''Final damage'''</span> = attack – armour*( attack/(attack + 0.5*armour) ) |
<span style="color:red">'''Final damage'''</span> = attack – armour*( attack/(attack + 0.5*armour) ) |
||
| − | <span style="color:blue">'''Enemy AA Reduction'''</span> = 1 - (random number between 0 and 1)* |
+ | <span style="color:blue">'''Enemy AA Reduction'''</span> = 1 - (random number between 0 and 1)*target's AA/150 |
| + | |||
| + | {{hide|title=Power Calculation Example| |
||
| + | [[File:AAPowerCalcDemo.png|none|600px]] |
||
| + | The Power of this Lexington would be |
||
| + | |||
| + | 7(from 1st slot's tbf) + 10*2 (from 2nd slot's btd) + 10*2 (from 3rd slot's btd) + 40(her firepower) |
||
| + | }} |
||
| Line 534: | Line 550: | ||
===Moderate damage protection(PVE only)=== |
===Moderate damage protection(PVE only)=== |
||
For all target that was not severely damaged before an attack, if receive attack that causes it to be severely damaged, then that attack will leave the target with 25%max HP(rounded down), and cause at least 1 damage. |
For all target that was not severely damaged before an attack, if receive attack that causes it to be severely damaged, then that attack will leave the target with 25%max HP(rounded down), and cause at least 1 damage. |
||
| + | Hence, ships whose HP are multiples of 4 have a big advantage over other ships. |
||
| + | {| class="mw-collapsed mw-collapsible wikitable" |
||
| + | ! Example |
||
| + | |- |
||
| + | |20/21Hp ship takes 100 damage, her HP goes down to 5.25, rounded down to 5/21, <span style="color:red">severely damaged</span> |
||
| + | |||
| + | 19/20Hp ship takes 100 damage, her HP goes down to 5, already a whole number, 5/20 is still only <span style="color:yellow">moderately damaged</span> |
||
| + | |||
| + | 18/19Hp ship takes 100 damage, her HP goes down to 4.75, rounded down to 4/19, <span style="color:red">severely damaged</span> |
||
| + | |} |
||
===Severe damage protection(PVE only)=== |
===Severe damage protection(PVE only)=== |
||
| − | For a target entering a battle healthy/moderately damaged, when she gets severely damaged in that battle, each attack will take off max HP*5%(rounded up) HP, and when target’s HP |
+ | For a target entering a battle healthy/moderately damaged, when she gets severely damaged in that battle, each attack will take off max HP*5%(rounded up) HP, and when target’s HP reaches 1, all attack will miss. '''Severe damage protection works if and only if you enter the node with moderately damaged or above HP.''' |
===Full HP protection(PVE only)=== |
===Full HP protection(PVE only)=== |
||
| Line 568: | Line 594: | ||
Affection linearly adds accuracy/evasion/critical rate (0% at 50 affection, 1% for every 10 extra affection, up to 15% at 200 affection). Penalty for having lower than 50 affection is not implemented. |
Affection linearly adds accuracy/evasion/critical rate (0% at 50 affection, 1% for every 10 extra affection, up to 15% at 200 affection). Penalty for having lower than 50 affection is not implemented. |
||
| + | |||
| + | It is recommended to place your fighters in smaller slots and attack planes(dive and torp bombers) at larger slots as you do not lose fighters if you have air supremacy all the time, but you lose a small portion of attack planes regardless. In later nodes, your fighter planes operate at full power regardless of slot size, but attack planes in bigger slots still attack at full power while attack planes in smaller slots might dip below squadron size. |
||
| + | |||
== Winning Rank == |
== Winning Rank == |
||
Latest revision as of 10:53, 4 March 2019
Combat is one of the most important systems in WSG. Players may start a battle by pressing the sortie button in your main menu, and pick any map you like to begin.It is a good way to consume your exceeding buckets and resources (or even your affection on your girls). There are multiple types of battle other than sortie, including historical campaign and exercise. Although the opponent may vary in these different types of battles, the basic mechanism of combat is the same. Typically, we use sortie as an example, for information on other two types of battle, see campaign and exercise.
The whole combat progress could be split into following parts:
01. Navigation
02. Recon
03. Buff
04. Preemptive air strike
05. Preemptive anti-sub strike
06. Preemptive torpedo strike
07. Shelling
08. Second round shelling
09. Torpedo strike
10. Night battle
11. Statistic
These phases are a complete combat circulation. Among them, phases 3 to 10 are actual battle. Phases 1, 2 and 11 are for strategy and tactic use. But please note that a battle progress does not always cover all the phases from 3 to 10. The battle will terminate whenever one side is completely destroyed, even there are still phases not covered.
For example, if your squadron sinks all enemy vessels in preemptive air strike, the combat will ignore all the remaining phases and reach statistic.
Statistic will not be ignored, as long as you start a battle.
Most formulae translated from 战斗流程公式详解 and NGA Forum
After you select a map and press begin button, you will see a map, full of nodes and dashed lines. This is the nautical chart of the sea area where your squadron is sealing in. The ship’s wheel is the node your squadron begins at. The final destination is the monster, where the boss is.
Normally, your squadron will go randomly along the dashed line. The squadron will not go backward so you don’t need to worry about that. The probability for getting into each course is labeled with stars. Usually, more stars means greater chance. However, according to the metaphysics that many people believe in, the actual probability of getting in different courses is not quite the same to what we see. And this turns out that they begin to rank their girls with their IQ, the ability to lead the whole squadron to the exact course that players want it to be in. Well, that would be another story. We don’t talk about that here.(It’s one of the reasons that HMS Renown is incredibly popular.)
Except for those random ones, there are still courses with specified conditions to get in. The condition varies in different maps. The requirements include but not limit to certain number of a particular type of vessels, squadron total level, recon or speed status, etc. These conditions restrict the combination of the squadron. It’s not only a challenge to your squadron, but also to every player, and their luck of course. (Requirement on 6 high-speed BB, for example)
At the end of each route, these are nodes to stop your squadron. These nodes are labeled with characters and each node is unique to others. The squadron will take different actions, depending on what kind of node it stays on.There are generally three kinds of nodes: battle, resource and standby. Now we can have a close look at these things.
Red Nodes
The most common ones are the red node. This means your squadron will enter a battle here. Just like what it says, a battle means your squadron will fight some enemy. The enemy here normally stands for the abyss. The combination of enemy squadron varies in different maps. Even on the same node, player may encounter different abyss squadron. Sometimes the difference is so great that you cannot make a universal combination to handle all these situations. (So don’t be surprised when you encounter some submarines.)
You may notice that some red nodes having a dashed circle around them. This special symbol indicates that your squadron may use extra fuel to avoid combat here. We will talk about this later in recon phase.
Green and Purple Nodes
Players may notice that there are also green and purple nodes in some maps. There is no enemy in these kinds of nodes, but some other action will take place instead. The green node is a supply node, if player’s squadron get to this node, you will be rewarded some of the resources. The amount and type of the resource you receive is fixed. Perhaps this is one of the few things which players could be certain with in this game. The purple node is generally similar to the green ones, but it works in an opposite way: to deduct resources from your deposit.
No matter you gain or lose ammo/fuel in resources node, it will directly affect your deposit. The supply of your squadron will not be affected.
Blue Nodes
The blue node is like a stop sign. Here's an easy way to keep it in mind. Imagine a stop sign. When you see a stop sign, you stop, right? Stop signs are red, so imagine a blue stop sign instead. Simple, right? Similar to green and purple nodes, the only difference is you will not gain or lose resources here. Your squadron will do nothing on this node, literally.(If you have to ask its function, well, maybe it’s designed to boost HMS Renown’s status, LOL.)
Reconnaissance
Recon phase is the very beginning phase of a battle. In other words, if there is no enemy in the node your squadron is on, recon phase will not be triggered. In this phase, your squadron will use their radar and scout plane (by imagination) and try to find out the location of your enemy. Recon does not always succeed. The probability is related to the recon status. We have an empirical formula for this calculation.
The sum of recon of your/enemy's entire squadron is used to calculate the success/fail of a reconnaissance
When your sum >= enemy’s sum+10, the recon will succeed
When your sum <= enemy’s sum-10, the recon will fail
Displayed recon value ignores decimal, but decimal places take part in actual calculation.
If enemy is spotted, your squadron will receive a 5% boost on evasion and accuracy when you entering the battlefield. In addition, you will be able to see intelligence about enemy formation before you decide yours. For the node with a symbol indicate that you can bypass without a fight, this is the exact time to do so.
To bypass enemy squadron, you need to locate your enemy first. After a successful recon, you may choose to fight your enemy or bypass them. By choosing fight, you will enter a battle like you always do in other nodes. By choosing bypass, you will make an attempt to avoid conflict. You will spend 10% of your squadron fuel by doing so, no matter it succeeded or failed.
If you succeed, your squadron will move on to the next node. But if you failed, your squadron will enter a battle without recon-successful buff. So think twice before you make your decision. Sometimes it decides your squadron’s fate.
Formation
Before your squadron entering a battlefield, you need to decide its formation. There are five formation options. They are Line Ahead, Double Line, Diamond, Echelon and Line Abreast. Each formation will have different effect on your squadron. Using them correctly will help players to over come challenges and win the battle.
Line Ahead
Line ahead is good for shelling. This formation allows every vessel in the squadron to unleash their deadly firepower. This formation gives vessels 100% firepower and accuracy. For those vessels that can fire twice, the accuracy of their second shelling will be boosted. The down side is that this formation is not good at evasion. For those squadrons in the middle of their way, this formation may not be their best choice.
Double Line
Double line is good for dodging enemy fire. This formation boosts evasion against incoming shells and torpedoes. In addition, vessels in this formation will receive extra evasion boost after being hit by enemy fire. For small vessels rely on evasion to survive enemy fire, the double line formation is a good choice. In exchange, the firepower and accuracy will slightly decrease. Therefore double line is not for those who enjoy blasting their enemy into pieces.
Diamond
Diamond is a formation specialized for anti-aircraft warfare. This formation will provide squadron increased anti-air defense, reduce damage taking from hostile aircraft, and an increase in evasion against aerial bombs and torpedoes. Even if your squadron gets hit by aerial attack, the diamond formation will lower the damage. Nevertheless, similar to the double line, diamond does not work well when attacking. Players will notice that their firepower decreases remarkably when using this formation.
Echelon
Echelon is somewhat like line ahead, a very powerful formation. With this formation, the player’s squadron will have a giant boost on accuracy and critical rate. Vessels with heavy artillery can deal massive damage to their enemy. However, such power will definitely cost you. All vessels in echelon formation will have their dodge lowered and have an increased chance to be hit with a critical hit. Using this formation, the squadron usually ends up severely damaged. But its raw power is still attractive to many players, especially those who need to challenge tough bosses.
Line Abreast
Line abreast focuses on anti-sub warfare. This formation enhances the player's fleet's anti-sub-related ability, including evasion against torpedoes, and depth charge accuracy and damage. The best thing is that this formation allows squadrons to perform a preemptive anti-sub attack, which means you may destroy enemy submarine before they can fire torpedoes. Doesn't that sound great? Finally you can get rid of those cowards who only attack from the bottom. But remember that this formation is for anti-sub warfare only. Your ships may fire artillery in this formation, yes, but expect their accuracy and damage to be slightly below average.
Coefficients
Day Battle Coefficicnt(DBC)
Random number between 0.89 and 1.22
Critical Coefficient(CC)
| Not Critical Hit | Critical Hit |
|---|---|
| 1 | 1.5 |
Direction Coefficient(DC)
| T Advantage | Parallel | Heading | T Disadvantage |
|---|---|---|---|
| 1.15 | 1 | 0.8 | 0.65 |
Ammunition Coefficient(AC)
| Ammo Left(%) | ≥50% | 40% | 30% | 20% | 10% | 0% |
|---|---|---|---|---|---|---|
| AC | 1 | 0.8 | 0.6 | 0.4 | 0.2 | 0 |
Ammunition Coefficient is calculated before entering battle.
Entering a battle costs 20% fuel and ammo each, entering a night battle consumes an extra 10% ammo.
Status Coefficient(SC)
| HP Bar | Healthy | Moderately Damaged | Severely Damaged |
|---|---|---|---|
| SC | 1 | 0.6 | 0.3 |
Formation Coefficient(FC)
| Stage | Line Ahead | Double Line | Diamond | Echelon | Line abreast |
|---|---|---|---|---|---|
| Opening/Closing Torpedo | 1 | 0.9 | 0.8 | 1 | 0.8 |
| Day Battle Shelling | 1 | 0.8 | 0.75 | 1 | 0.8 |
| Night Battle | 1.1 | 0.9 | 1 | 1 | 1 |
Aerial battle
Aerial control
Your fleet's total aerial power is the sum of all your ships' single slot aerial power value, and both side's total aerial power is used to determine outcome of aerial battle. Fighter planes will be lost depending on the outcome of aerial battle.
Squadron Size = 3 + firepower/5
Flyout amount = the smaller one between squadron size and the amount of airplanes left in the slot
Flyout amount determines how many planes from that slot engage in battle at that particular node/stage, all other planes from that slot remain on the CV.
Single slot power = ln[(flyout amount+1)*2]*plane's AA
Total aerial power = sum of all your single slot power
| Flyout Amount Calculation Example |
|---|
 Flyout amount for first slot=11 (20>11) Flyout amount for second slot=11 (20>11) Flyout amount for third slot=11 (35>11) Flyout amount for fourth slot=10 (11>10) |
Relationship between total aerial power, aerial battle outcome, and fighter plane lost
| Outcome | Plane Lost | Aerial Control Coefficient ACC | |||||
|---|---|---|---|---|---|---|---|
| Yours | > | Enemy's *3 | Air Supremacy | 0% | 1.1 | ||
| Enemy's *3 | ≥ | Yours | > | Enemy's * 1.5 | Air Superiority | 5% to 10% | 1.05 |
| Enemy's * 1.5 | ≥ | Yours | > | Enemy's/1.5 | Air Parity | unknown | 1 |
| Enemy's/1.5 | ≥ | Yours | > | Enemy's/3 | Air Denial | unknown | 0.95 |
| Enemy's/3 | ≥ | Yours | Air Incapability | up to 95% | 0.9 |
Plane lost will be integer multiples of 5%
Opening Air Strike
Severely damaged ships will not participate.
Each slot is calculated separately
Squadron Size = 3 + firepower/5
Flyout amount = the smaller one between squadron size and the amount of airplanes left in the slot
Each slot's slot value = ln(flyout amount+1)*2*carried plane's value + 25
Final damage is the number you see. It is rounded up.
Dive Bombers
Attack: slot value*ACC*SC*AC*DBC*CC
Final damage = attack – armour*( attack/(attack + 0.5*armour) )
Torpedo Planes
Attack: slot value*ACC*SC*AC*DBC*CC*Torpedo Plane Coefficient
Final damage = attack – armour*(attack/(2*attack + 0.5*armour))
Torpedo Plane Coefficient = random number between 0.5 and 1
Lex and Sara's skills multiplies 1.15 to Attack value.
Planes Lost During Opening Air Strike
Actual Anti-Air = (ship's own AA + sum of entire fleet's AA adjustment values)*coefficient
Coefficient = random number between 0 and 1.5
AA adjustment: the biggest product of equipment AA value and its AA adjustment on each ship will be added to the whole team’s AA value.
- Eg. A ships carries an equipment with 5 AA and 40% adjustment, plus an equipment with 11 AA and 35% adjustment.
- 5*40% = 2, and 11*35% = 3.85. Therefore this ships's AA adjustment value is 3.85.
Bomber and torpedo plane lost: Ships have a chance to destroy planes attacking them.The maximum number of planes a ship can destroy is its actual AA/10, rounded down.
- Eg. A ship's Actual AA is determined to be 90 for a battle, then that ship can at most destroy 9 enemy planes attacking her during opening air strike of that battle.
Determining Direction
- Parallel: No effects
- Heading: Both your and enemy fleet's firepower-20%
- T Crossing:
- (Advantage) Firepower+15%
- (Disadvantage) Firepower-35%
The direction does not affect the damage of CV and CVLs.
Before version 1.3.7, the direction is random selected. From v1.3.7 and on, a new mechanism is implemented in which the direction is determined by the difference between your fleet's and enemy's speed.
| Details of direction determination |
|---|
| Your fleets are classified into three groups: capital ships, support ships and submarines.
Capital ships include: BB, BC, BBV, CV, CVL, BM. Support ships are: CA, CL, DD, supply ship. The average speed of each group is calculated, then the lower one is used in direction calculation. But when there is any surface ship, submarines' speed are ignored and not calculated. For example, if you have a fleet of 5 DDs and Nevada (21 knots), Nevada's 21 knots will be used. A fleet of 5 fast BB/CV and Ning Hai (20 knots) will use Ning Hai's 20 knots. A fleet of 2 BB (30 and 28 knots), 3 DD (45, 20 and 37 knots) and 1 SS (20 knots) will use the average of 2 BB's 29 knots to determine direction. The higher your average speed is, the higher chance of T-advantage and parallel. The lower your average speed is, the higher chance of T-disadvantage. If recon succeeded, and your average speed is higher than enemy's by at least 5 knots, then you are guaranteed no T-disadvantage. When your flagship's speed is lower than average, you will run into more heading and less T-advantage. When your flagship speed is higher than average, you will run into less heading, and the other three directions will increase together. 1 knot of flagship speed/average speed affects your direction rates by about 1%. Failing recon will have a negative impact of approximately 10 knots of average speed. Default rate when recon succeeded, and average speed of both sides are the same: T-advantage: parallel: heading : T-disadvantage = 23% : 41% :30% :6% Default rate when recon failed, and average speed of both sides are the same: T-advantage: parallel: heading : T-disadvantage = 12% : 35% :35% :18% Source : 非洲研究院:关于航向分布的进一步研究 Note: BM counts as support ships when determining direction, but counts as capital ship everywhere else(skipping chance and echelon locking). |
Opening Anti-Sub(for Line Abreast only)
Non-CVL
Without depth charge
- Attack = ship's antisub/3 * (1+ 0.1*equipment antisub)*SC*AC*DBC*CC
With depth charge
- Attack = (ship's antisub/3 + 30 + 1.3*depth charge antisub) * (1+ 0.1*equipment antisub)*SC*AC*DBC*CC
Final damage = attack – armour * (attack/(2*attack + 0.5*armour))
CVL
- Unknown
Opening torpedo(SS and CLT)
Attack = (torpedo+5)*SC*AC*DBC*CC*FC*DC
Formation Coefficient(FC)
| Formation | Line Ahead | Double Line | Diamond | Echelon | Line abreast |
|---|---|---|---|---|---|
| FC | 1 | 0.9 | 0.8 | 1 | 0.8 |
Final damage = attack – armour * (attack/(attack + 0.5*armour))
Shelling
Antisub
Non-CVL
- Without depth charge
- Attack = ship's antisub/3 * (1+ 0.1*equipment antisub)*SC*AC*DBC*CC
- With depth charge
- Attack = (ship's antisub/3 + 30 + 1.3*depth charge antisub) * (1+ 0.1*equipment antisub)*SC*AC*DBC*CC
Final damage = attack – armour * (attack/(2*attack + 0.5*armour))
CVL
- Unknown
NON-CV
Attack = (firepower+5)*SC*AC*DBC*CC*FC*DC
Formation Coefficient(FC)
| Formation | Line Ahead | Double Line | Diamond | Echelon | Line abreast |
|---|---|---|---|---|---|
| FC | 1 | 0.8 | 0.75 | 1 | 0.8 |
Final damage = attack – armour* (attack/(0.6*attack + 0.5*armour))
CV/CVL
Power = sum of dive bomber value*2 + sum of torp bomber + firepower (for dive bomber and torp bomber values to count, there must be at least 1 plane left in the slot)
Attack= (power*Enemy AA Reduction+35)*ACC*SC*AC*DBC*CC
Final damage = attack – armour*( attack/(attack + 0.5*armour) )
Enemy AA Reduction = 1 - (random number between 0 and 1)*target's AA/150
| Power Calculation Example |
|---|
|
The Power of this Lexington would be 7(from 1st slot's tbf) + 10*2 (from 2nd slot's btd) + 10*2 (from 3rd slot's btd) + 40(her firepower) |
Closing torpedo
Identical to opening torpedo
Night Battle
Severely damaged ships will not participate
Night battle Chart attack & night battle coefficient & night battle armour adjustment
| Ship types | Night Battle Attack | Night Battle Coefficient NBC |
Night Battle Armour Coefficient NBAC |
|---|---|---|---|
| BB/BC/BM | Firepower | 1.2~1.8 | 1 |
| DD/SS/SC | Torpedo | 2.4~3.0 | 0.6 |
| CA/CL with Torpedo | Firepower + Torpedo | 1.2~1.8 | 0.6 |
| CA/CL without Torpedo | Firepower | 2.4~3.6 | 1 |
attack = (Night Battle Attack+10)*SC*AC*FC*CC*NBC
Formation Coefficient(FC)
| Formation | Line Ahead | Double Line | Diamond | Echelon | Line abreast |
|---|---|---|---|---|---|
| FC | 1.1 | 0.9 | 1 | 1 | 1 |
Final damage = attack – armour *(attack/(0.6*attack/NBAC + 0.5*armour))
Damage Protections
Moderate damage protection(PVE only)
For all target that was not severely damaged before an attack, if receive attack that causes it to be severely damaged, then that attack will leave the target with 25%max HP(rounded down), and cause at least 1 damage. Hence, ships whose HP are multiples of 4 have a big advantage over other ships.
| Example |
|---|
| 20/21Hp ship takes 100 damage, her HP goes down to 5.25, rounded down to 5/21, severely damaged
19/20Hp ship takes 100 damage, her HP goes down to 5, already a whole number, 5/20 is still only moderately damaged 18/19Hp ship takes 100 damage, her HP goes down to 4.75, rounded down to 4/19, severely damaged |
Severe damage protection(PVE only)
For a target entering a battle healthy/moderately damaged, when she gets severely damaged in that battle, each attack will take off max HP*5%(rounded up) HP, and when target’s HP reaches 1, all attack will miss. Severe damage protection works if and only if you enter the node with moderately damaged or above HP.
Full HP protection(PVE only)
If target has full HP, and receives damage enough to take away more than 75% of its HP, it will be adjusted to randomly take off anywhere between 50%~75% of its maximum HP.
Other things to note
Players attack first
For opening air atrike and opening/closing torpedo, even though animation happens concurrently, players actually attack before enemy. For opening air strike, if enemy’s CV/CVL was sink by player, enemy’s attack will be counted as if they launch the attack severe damaged. For opening/closing torpedo, enemy that was sink/severely damaged by players simply don’t attack.
Formations
| Evasion against Torpedo (and torpedo planes) |
Double Line = Line Abreast > Line Ahead = Diamond > Echelon |
| Evasion against Shelling | Double Line > Line Ahead = Line Abreast = Diamond > Echelon |
| Evasion against Bomber | Double Line =Diamond > Line Ahead = Line Abreast = Echelon |
| Accuracy | Echelon > Line Ahead 2nd round > Line Ahead 1st round > Double Line = Diamond > Line Abreast |
Others
CV/CVL's damage is unaffected by formation
Accuracy ranges from 5%~95%, you always have at least 5% chance to land a hit, and at least 5% chance to miss.
Affection linearly adds accuracy/evasion/critical rate (0% at 50 affection, 1% for every 10 extra affection, up to 15% at 200 affection). Penalty for having lower than 50 affection is not implemented.
It is recommended to place your fighters in smaller slots and attack planes(dive and torp bombers) at larger slots as you do not lose fighters if you have air supremacy all the time, but you lose a small portion of attack planes regardless. In later nodes, your fighter planes operate at full power regardless of slot size, but attack planes in bigger slots still attack at full power while attack planes in smaller slots might dip below squadron size.
Winning Rank
Winning Rank is applicable for battles, drills, and campaigns.
There are 4 winning ranks in the game:
SS/Total Victory
- Sunk all enemy ships.
- No hits taken.
S/Victory
- Sunk all enemy ships.
- At least 1 hit taken
- None of your ships retreated. (N/A for Drill mode)
A/Victory
- Doesn't meet criteria to get S Victory.
- Sunk 2/3 or more enemy ships (Round up the result if it isn't divisible by 3) AND none your own ship retreated(N/A for Drill mode).
- Sunk enemy flagship and your fleet remain untouched.
B/Tactical Victory
- Doesn't meet criteria to get A Victory.
Meet any of the following criteria:
- 1. Sunk enemy flagship.
- 2. Enemy flagship is alive, you need to meet both of following criteria for B Victory:
- Sunk at least one ship
- Done more damage than 250% of enemy.
- 3. Sunk enough enemy ships for A or S, but one of your own ships retreated. (N/A for Drill mode)
C/Tactical Failure
- Doesn't meet criteria to get B Victory.
Meet only one of the following criteria:
- Sunk at least one ship
- Done more damage than 250% of enemy.
D/Failure
- Doesn't meet any criteria above.